If you haven't seen a stamping bella stamp you don't know what you are missing. Let's just say Italian woman with attitude right here and I can relate to mz bella!
So having resigned from CTMH to pursue other creative avenues I have felt the tickling of discovering what else is out there. So I ventured, I purchased and now I can truly say I've played "Bella Style"
For my first purchase I went with "Clickabella" just because I can totally relate...being on the computer nearly 24/7 these days and "Flowahbella". My next purchase will be "Cakeabella" and possibly a "fella".
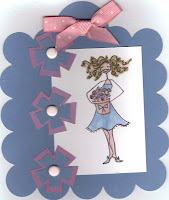
Here is my first play session with "Flowahbella" whatcha think? Isn't she just the bomb?
I have to say my husband thinks I'm nutz. I haven't had time all week to play and I got my bella's early in the week...so yesterday I stamped her and then went to bed...got up an hour or so later and resigned to try a bit o' color on her. Needless to say I got that outta my system and resumed sleeping at around midnight...only to comeback to my craft room today and finish up these racing thoughts of how to do my bella justice.
So having resigned from CTMH to pursue other creative avenues I have felt the tickling of discovering what else is out there. So I ventured, I purchased and now I can truly say I've played "Bella Style"
For my first purchase I went with "Clickabella" just because I can totally relate...being on the computer nearly 24/7 these days and "Flowahbella". My next purchase will be "Cakeabella" and possibly a "fella".
Here is my first play session with "Flowahbella" whatcha think? Isn't she just the bomb?
I have to say my husband thinks I'm nutz. I haven't had time all week to play and I got my bella's early in the week...so yesterday I stamped her and then went to bed...got up an hour or so later and resigned to try a bit o' color on her. Needless to say I got that outta my system and resumed sleeping at around midnight...only to comeback to my craft room today and finish up these racing thoughts of how to do my bella justice.

